|
|
| (4 intermediate revisions by 2 users not shown) |
| Line 1: |
Line 1: |
| [[File:Infinite Mountain Dungeon.png|right|option]] | | [[File:Infinite Mountain Dungeon.png|right|option]] |
|
| |
|
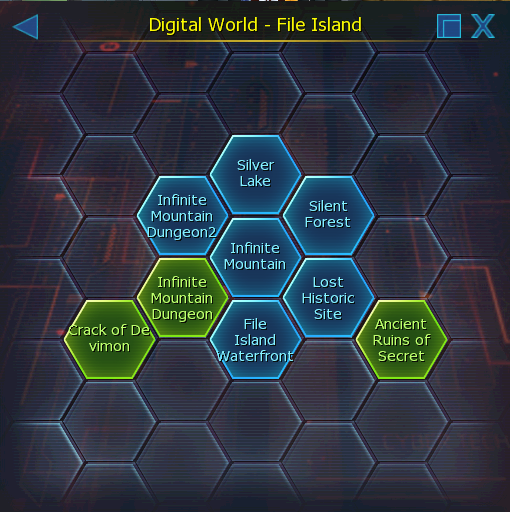
| The final area of File Island, the lair of the dark and evil '''Devimon,''' and the required area to reach Server Continent Desert.
| | <div class="mh"><imagemap> |
| | File:File Island-World Map.png|right |
|
| |
|
| This also houses a very special trinket to use on your burst modes...
| | rect 230 135 280 212 [[Silver Lake]] |
| | rect 305 180 353 253 [[Silent Forest]] |
| | rect 302 264 353 327 [[Lost Historic Site]] |
| | rect 378 301 425 373 [[Ancient Ruins of Secret]] |
| | rect 231 307 280 377 [[File Island Waterfront]] |
| | rect 233 225 279 291 [[Infinite Mountain]] |
| | rect 156 262 207 334 [[Infinite Mountain Dungeon]] |
| | rect 84 298 133 375 [[Crack of Devimon]] |
| | rect 157 174 205 250 [[Infinite Mountain Dungeon 2.0]] |
|
| |
|
| ==Digimon==
| | desc bottom-right |
| | </imagemap></div> |
|
| |
|
| * Only [[Kuwagamon (Raid)]] appears by itself, the next raids are summoned by the player who got rank 1 in the previous Raid.
| | The final area of File Island, the lair of the dark and evil '''Devimon,''' and the required area to reach Server Continent Desert. |
| | |
| * The digimon here are past Raids that are much more tankier than before.
| |
| | |
| {| class="wikitable" style="text-align:center;" style="width: 450px"
| |
| |- style="background-color:#e02c5b; color:#000000;" style="text-align:center;"
| |
| ! colspan="7" style="font-family:Arial, Helvetica, sans-serif !important;; background-color:#e02c5b;" | Kuwagamon (Raid)
| |
| |- style="text-align:center;"
| |
| | rowspan="2" | [[File:Kuwagamon Icon.png]]
| |
| | [[File:Defensive.png]]
| |
| | [[File:Virus.png]]
| |
| | rowspan="2" | [[File:Wind.png]]
| |
| | rowspan="2" | HP: ?
| |
| | rowspan="2" | Level: 99
| |
| | rowspan="2" | Skill: ?
| |
| |- style="text-align:center;"
| |
| | [[File:Aggressive.png]]
| |
| | Raid
| |
| |}
| |
| | |
| | |
| {| class="wikitable" style="text-align:center;" style="width: 450px"
| |
| |- style="background-color:#e02c5b; color:#000000;"
| |
| ! colspan="7" style="font-family:Arial, Helvetica, sans-serif !important;; background-color:#e02c5b;" | Meramon (Raid)
| |
| |- style="text-align:center;"
| |
| | rowspan="2" | [[File:Meramon Icon.png]]
| |
| | [[File:Defensive.png]]
| |
| | [[File:Data.png]]
| |
| | rowspan="2" | [[File:Fire.png]]
| |
| | rowspan="2" | HP: ?
| |
| | rowspan="2" | Level: 99
| |
| | rowspan="2" | Skill: ?
| |
| |- style="text-align:center;"
| |
| | [[File:Aggressive.png]]
| |
| | Raid
| |
| |}
| |
| | |
| | |
| {| class="wikitable" style="text-align:center;" style="width: 450px"
| |
| |- style="background-color:#e02c5b; color:#000000;"
| |
| ! colspan="7" style="font-family:Arial, Helvetica, sans-serif !important;; background-color:#e02c5b;" | Monochromon (Raid)
| |
| |- style="text-align:center;"
| |
| | rowspan="2" | [[File:Monochromon Icon.png]]
| |
| | [[File:Defensive.png]]
| |
| | [[File:Data.png]]
| |
| | rowspan="2" | [[File:Land.png]]
| |
| | rowspan="2" | HP: ?
| |
| | rowspan="2" | Level: 99
| |
| | rowspan="2" | Skill: ?
| |
| |- style="text-align:center;"
| |
| | [[File:Aggressive.png]]
| |
| | Raid
| |
| | |
| |}
| |
| | |
| | |
| {| class="wikitable" style="text-align:center;" style="width: 450px"
| |
| |- style="background-color:#e02c5b; color:#000000;"
| |
| ! colspan="7" style="font-family:Arial, Helvetica, sans-serif !important;; background-color:#e02c5b;" | Ogremon (Raid)
| |
| |- style="text-align:center;"
| |
| | rowspan="2" | [[File:Ogremon Icon.png]]
| |
| | [[File:Defensive.png]]
| |
| | [[File:Virus.png]]
| |
| | rowspan="2" | [[File:Pitch Black.png]]
| |
| | rowspan="2" | HP: ?
| |
| | rowspan="2" | Level: 99
| |
| | rowspan="2" | Skill: ?
| |
| |- style="text-align:center;"
| |
| | [[File:Aggressive.png]]
| |
| | Raid
| |
| |}
| |
| | |
| | |
| {| class="wikitable" style="text-align:center;" style="width: 450px"
| |
| |- style="background-color:#e02c5b; color:#000000;"
| |
| ! colspan="7" style="font-family:Arial, Helvetica, sans-serif !important;; background-color:#e02c5b;" | Leomon (Raid)
| |
| |- style="text-align:center;"
| |
| | rowspan="2" | [[File:Leomon Icon.png]]
| |
| | [[File:Defensive.png]]
| |
| | [[File:Vaccine.png]]
| |
| | rowspan="2" | [[File:Fire.png]]
| |
| | rowspan="2" | HP: ?
| |
| | rowspan="2" | Level: 99
| |
| | rowspan="2" | Skill: ?
| |
| |- style="text-align:center;"
| |
| | [[File:Aggressive.png]]
| |
| | Raid
| |
| |}
| |
| | |
| | |
| {| class="wikitable" style="text-align:center;" style="width: 450px"
| |
| |- style="background-color:#e02c5b; color:#000000;"
| |
| ! colspan="7" style="font-family:Arial, Helvetica, sans-serif !important;; background-color:#e02c5b;" | Devimon (Raid)
| |
| |- style="text-align:center;"
| |
| | rowspan="2" | [[File:Devimon Icon.png]]
| |
| | [[File:Defensive.png]]
| |
| | [[File:Virus.png]]
| |
| | rowspan="2" | [[File:Pitch Black.png]]
| |
| | rowspan="2" | HP: ?
| |
| | rowspan="2" | Level: 99
| |
| | rowspan="2" | Skill: ?
| |
| |- style="text-align:center;"
| |
| | [[File:Aggressive.png]]
| |
| | Raid
| |
| |}
| |
| | |
| | |
| ==Drops==
| |
| {|
| |
| |- style="vertical-align:top;"
| |
| | style="height:100px; width:500px;"| '''[[File:Monochromon Icon.png]] Other Raids'''
| |
| *[[File:Chicken Combo.png]][[Chicken Combo]]
| |
| *[[File:Black Coghwheel.png|link=Special:FilePath/Black_Coghwheel.png]][[Black Cogwheel]]
| |
| *[[File:Black Cogwheel_Fragment.png|link=Special:FilePath/Black_Cogwheel_Fragment.png]][[Black Cogwheel Fragment]]
| |
| *[[File:Giga Box.png]][[Giga Box]] (Rank 1 only)
| |
| *[[File:Mega Box.png]][[Mega Box]] Have a chance to drop for players within certain rank
| |
| **Kuwagamon = Rank 2-5
| |
| **Meramon = Rank 2-20
| |
| **Monochromon = Rank 2-8
| |
| **Leomon = Rank 2-12
| |
| **Ogremon = Rank 2-20
| |
| **Devimon = Rank 1-50 (Rank 1 player is guaranteed a Giga Box, with a chance of receiving an additional Mega Box)
| |
| |}
| |
|
| |
|
| | This also houses a very special trinket to use on your burst modes... |
|
| |
|
| | ==Raid== |
| | *You can find out when Raids appear by viewing the timer in the DMW Discord group. Just write the name of the map/Digimon at the top right, in the search bar, and a bot will show you the time of the next spawn. |
|
| |
|
| {| | | {{mobs |
| |- style="vertical-align:top;" | | |name=Kuwagamon |
| | style="height:100px; width:500px;"| '''[[File:Devimon Icon.png]] Devimon''' | | |levels=99 |
| *[[File:Tamer Change Taichi.png|link=Exchange Tamer Item (Tai)]][[Exchange Tamer Item (Tai)]] (Character Bound)
| | |element=Wind |
| *[[File:Black Gear Evolution Program.png]][[Burst Mode|Black Gear Evolution Program]]
| | |attr=Virus |
| | |hp=? |
| | |behavior=Aggressive |
| | }} |
| | {{mobs |
| | |name=Meramon |
| | |levels=99 |
| | |element=Fire |
| | |attr=Data |
| | |hp=? |
| | |behavior=Aggressive |
| | }} |
| | {{mobs |
| | |name=Monochromon |
| | |levels=99 |
| | |element=Land |
| | |attr=Data |
| | |hp=? |
| | |behavior=Aggressive |
| | }} |
| | {{mobs |
| | |name=Ogremon |
| | |levels=99 |
| | |element=Pitch Black |
| | |attr=Virus |
| | |hp=? |
| | |behavior=Aggressive |
| | }} |
| | {{mobs |
| | |name=Leomon |
| | |levels=99 |
| | |element=Fire |
| | |attr=Vaccine |
| | |hp=? |
| | |behavior=Aggressive |
| | }} |
| | {{mobs |
| | |name=Devimon |
| | |levels=99 |
| | |element=Pitch Black |
| | |attr=Virus |
| | |hp=? |
| | |behavior=Aggressive |
| | }} |
|
| |
|
| |}
| | ===Drops=== |
| | You can obrain one of these item: |
|
| |
|
| ==Lootboxes==
| |
| {| | | {| |
| |- style="vertical-align:top;" | | |- style="vertical-align:top;" |





 Giga Box
 Mega Box